Showing posts with label shorts. Show all posts

Tuesday, May 24, 2016

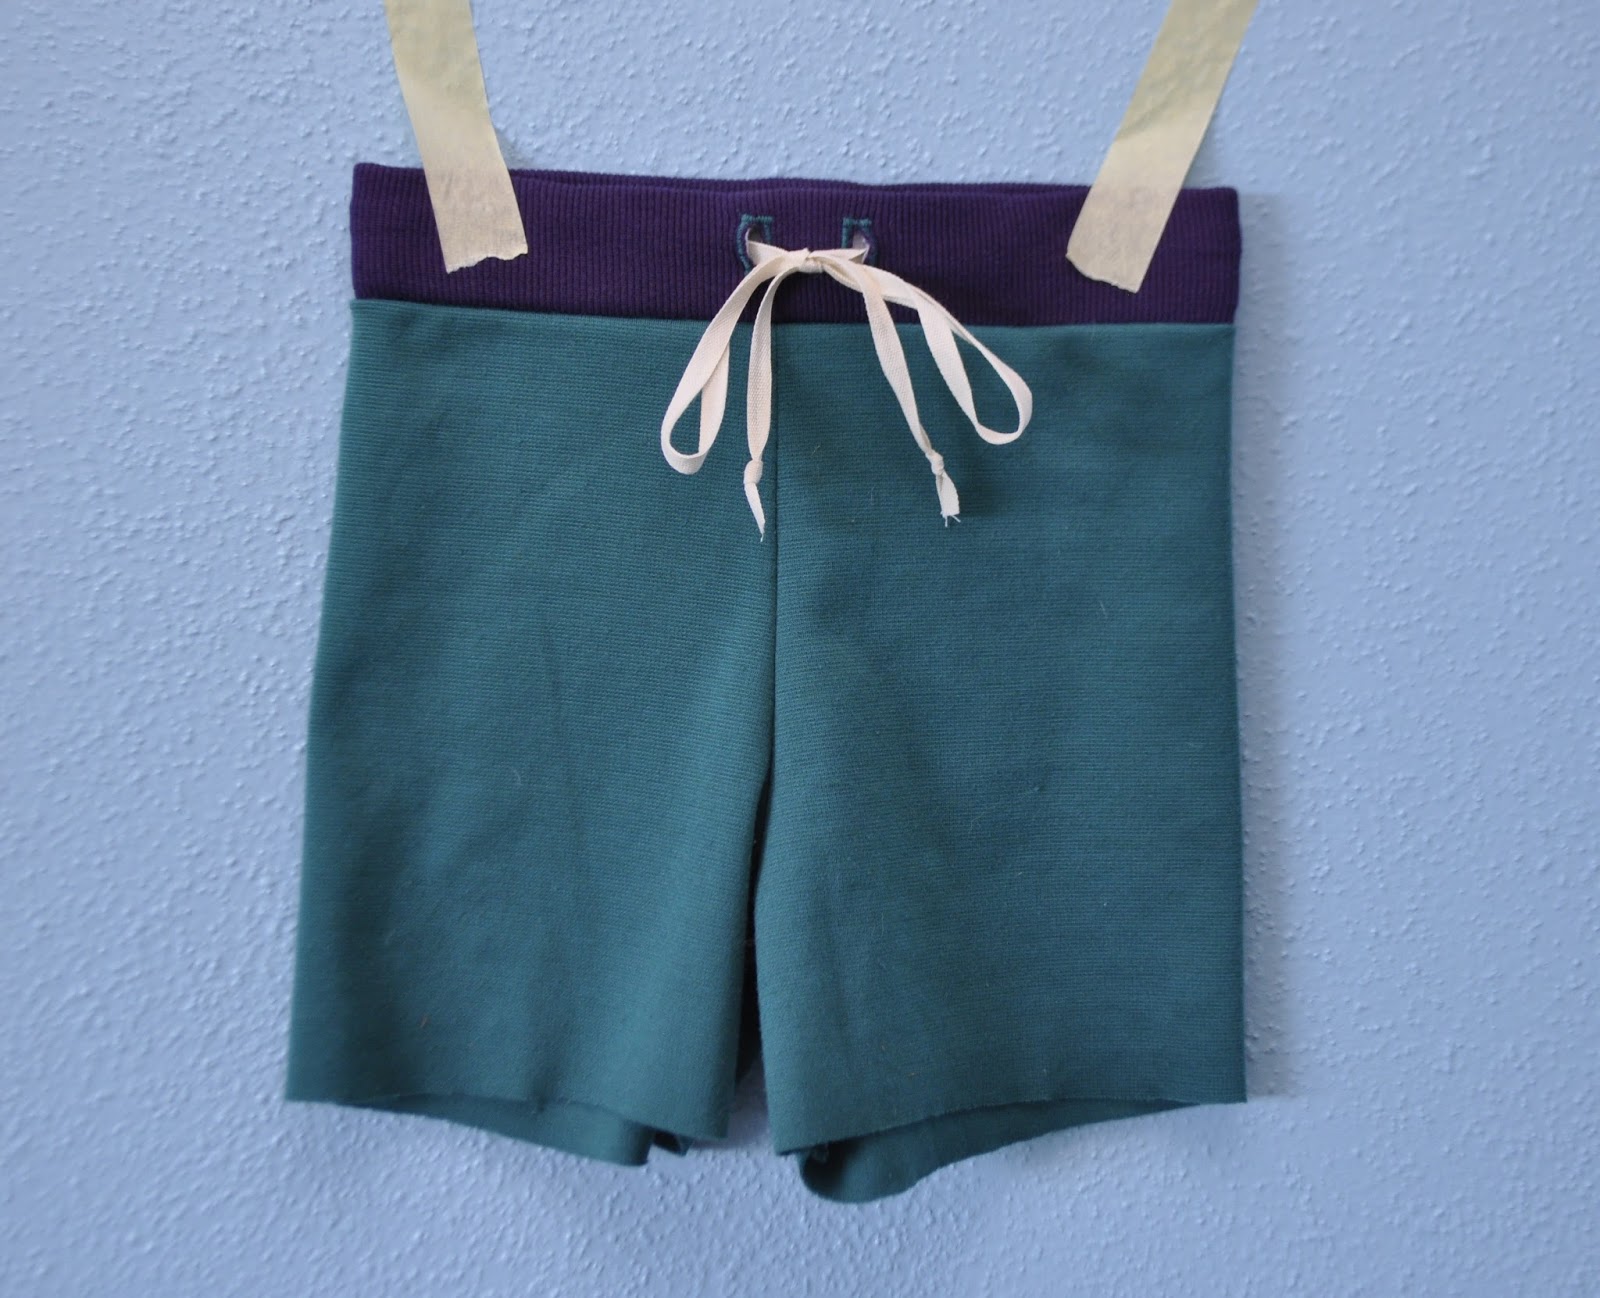
KCW City Gym Shorts in french terry


KCW snuck up on me! I've been in a bit of sewing slump lately, and so far this week is just what I've needed to get my sewing mojo back.

I've been searching for cute knit shorts patterns (last year's attempt at modifying the Ananda pants pattern fit funny) and stumbled across the City Gym Shorts, a free pattern by Purl Soho. Which was funny, because they were already downloaded onto my computer. Before rediscovering them, I was considering buying the Prefontaine shorts pattern.

Seriously funny pose. Glad I accidentally put her in a tummy shirt.
I couldn't find any knit kids editions on the interwebs, so I winged it. I used a wonderfully soft french terry from Raspberry Creek Fabric (similar one here) for the body and this cotton/spandex jersey for the binding. I cut the binding 1 3/4", stitched it to the front, wrapped it to the back and stitched in the ditch (I was out of out of matching thread or I would have sewn on the binding instead of stitching in the ditch). The bow is just extra binding sewn on, not a functional drawstring.

The new growth is so soft, Momma!
At first Stella thought they looked a little crazy, then she warmed up to them. I LOVE them. Like I really don't want her to wear and destroy them, like she's apt to. The little terrorist.

It passed the buttcrack test.
The pattern was really terrific, especially for a free pattern. I can't wait to make the adult version, although I really don't need another pair of around the house shorts!

Picnic lunch pb&j frozen waffles.
Charlotte also wanted to strike a pose. Not sure what this pose is, but it's what she struck.
 Off to do more sewing! This time woven City Gym Shorts for the girls.


Tuesday, June 30, 2015

KCW Wrap-up

This was the first KCW I've been able to participate in. It was productive! Most days I spent much more than an hour, but a couple days I just spent an hour. It was a bit disheartening at first because 4 of the 5 pairs of pants had issues. But they were worked out and lessons learned for next time.

The theme this season was "traveling". The only way I followed it was by sewing only comfy clothes!

Days 1 and 2: Cut out and sewed five pairs pants. Three Go To Leggings (shorties in same fabric as capris not pictured), capri length and modified shorts Ananda Pants.

Capri length with calf cut out option in size 4T. The cut-outs would not be even! I have some running capris out of the same fabric and Stella has been asking for some so I was happy to oblige.


Full length leggings in size 12 mo width, 2T length (with even more width taken out for my skinny legged girl).

 
Capri length Ananda pants in size 4T. (This is the 4th pair of these pants I've made, and I love them! I got the pattern as part of a bundle and it's wonderful.)


Ananda pants cut in shorts length with regular waistband (next time I make this modification I need to remember to trim down the height of the shorts by an inch or so as they ended up quite high-waisted). I'm still deciding whether I'll hem them or not.


Fabric: Black ponte de roma from Urban Sew, pink tonal jersey and teal ponte de roma from Girl Charlee (not there anymore), heathered teal performance knit from Jo-Ann's, purple ribbing from    Jo-Ann's

(Side  note: I love Urban Sew! I emailed them to ask about the quality of their ponte because I was so disappointed by the quality of the stuff I got from Girl Charlee, and they offered to send me swatches for free. I got the charcoal, black and white and washed and dried them with every load of laundry for a couple weeks and they were great! They aren't quite as soft as the pontes from Girl Charlee, but they didn't pill at all. Consequently, I ordered 5 yards of the black and 3 of the charcoal along with other goodies. Plus, they donate a buck from every purchase to help out foster kids.)

Day 3: Cut out pattern and fabric for Oliver + s Ruffled Halter.

Day 4: Worked on halter

Day 5: Finished halter and cut out Uptown/Downtown Dress

The ruffled halter is full of cuteness! (Between size small and medium.)


Fabric: Blue gingham upcycled from curtains from my old kitchen (from Walmart originally), and stolen from my mom's stash (I'm pretty sure). It ironed like it had polyester in it so I'm hoping it won't wrinkle very much.

Day 6: Finished Oliver + s Lullaby Layette Bodysuit for a friend. Size 6-12 months and my own version of flutter sleeves. They were 75% completed before KCW. There should be an unfinished project KCW!


I couldn't decide what color so I did three!


Fabric: Lisette poplin from Joann's red tag section

Day 7: Finished Uptown/Downtown Dress. It was a pretty slinky sweater knit, and the neckline is a bit to low to wear in public until Stella's a little bigger. I made a 5T according to her measurements. It'll work for a nightgown for now! Other than the neckline it fits well, so I've already cut out a modified version.


Fabric: Sweater knit from Girl Charlee (not there anymore)

Tuesday, June 23, 2015

Pattern review: Oliver + s class picnic blouse

So this isn't a KCW post...it was actually sewn in May. I'm just now getting it posted, though, because I'm bad at posting stuff.

(About KCW where you sew an hour a day for your kids for a week - I'm actually participating this time! I'll do a wrap up post at the end of the week.)

I can't believe it took me this long to sew this pattern! Thankfully, the sizing is generous so I should be able to squeeze a year (or two) out of it for Stella. (More about the shorts here.)


pardon the wrinkles


Partners in crime.

Just catching butterflies...or Marvin the cat
Both the shorts and blouse were nice happy sews that didn't require too much thinking or learning any new skills. The blouse especially would be good for beginners. However, I wouldn't recommend sewing it up with this fabric combo for beginners. It made me swear a lot. (Although, since I sewed the bulk of it when the girls were awake, the swearing was unfortunately silent.) Shifty little....

After I finished it up on Memorial Day, Stella and I went on an adventure to a nursery and got some veggie starts and smelled all the roses, then we went to the grocery store and got supplies for a (just our little) family BBQ. It's fun to have unhurried adventures with one daughter at a time!


She picked snapdragons for her plot in the garden.

Unfortunately, while I was planting the veggie starts, I looked up to this:


Dirt angels and dirtcastles in case you were wondering. 
Amazingly, I didn't freak out, just reminded her she should also take off her new shorts. I still haven't washed them yet, they're sprayed with oxy-clean and I'm a little scared. Why must she immediately ruin clothing? Oh yes, because she's three. I keep reminding myself that being clean is not a high priority right now, and she keeps reminding me that she's my daughter. (I do remember a fun afternoon spent sliding between muddy rows of green beans when my dad questioned why we kept our clothes and rubber boots on and we had to be sprayed off with a hose outside. Oh, it was fun when the irrigation was close to the house.)


Pattern: Oliver + s Class Picnic Blouse and Shorts

Sizing: The shorts were spot on and the fit of the blouse was generous. I added an inch or so to it, but it didn't need it. (I sewed a 3T in the shorts and 4T in the blouse because Stella has a long torso and a little butt.)

Material used: Lawn (maybe?) and voile from a Lisette line at Joann's a couple years ago for the blouse and chambray from Joann's for the shorts.

Notions needed: 1/4" elastic for the top, 3/4" elastic for the shorts

Appropriately rated: Yes. Rated advanced beginner (although I think the blouse is beginner appropriate).

Time spent: Shorts were a two evening job, blouse a one evening project.

Modifications: None

Comments: Such a nice pattern! The shorts are worth the extra effort for the facings. The fit of the blouse was generous. It's a wonderful summertime outfit!

And now for some pictures of Charlotte since she gets pretty jipped as the receiver of hand-me-downs.

So full of spunk
 
Did you know this was a Carhartt ad? I wish.


Up, please! All. the. time. But she's so very cute...


Linked up over at:

http://www.straight-grain.com/?p=6721
http://www.straight-grain.com


Monday, May 18, 2015

More shorts...


I've been wanting to sew up this pattern for awhile, and Stella is growing out of the size range I have so I thought I'd better hurry! So after much hemming and hawing over fabric choice I finally fell on a lightweight chambray and a Lisette voile, both from Joann's a couple years ago. The chambray is going to wrinkle horribly...errgh. The waistband facing is another Lisette print (maybe a lawn?). A coordinating Class Picnic blouse is in the works (now blogged here).

View of the back of the shorts
 
Front waistband facing
 
Every time I see this pattern sewn up in the blogosphere I want to make it! Two of my favorites are these by probably actually and these by skirt as top. The Oliver + s flickr group has a ton of great ones, too. I've always been turned off on it because the hem facing looked like it took forever. It turned out to sew up faster than I thought it would. The pattern and instructions were great and completely up to the usual Oliver + s standard.

I remembered to add a size tag!
 
I sewed a 3T because I want them to fit now, but probably should have sewn a 4. Hopefully they'll make it through the summer. Stella is refusing to model clothes for pics lately and it's not worth the fight. Thankfully, she still likes wearing them! Little sister is also a fan of trying on big sister's clothes.
 
Why yes, that is a Christmas rug next to the sliding door....in May.
 
What our living room looks like 90% of the time. Card tables make the best forts!


Thanks for stopping by! Follow me on bloglovin' or by email (over on the sidebar).


Linked up over at:

http://nap-timecreations.com/2015/05/create-link-inspire-party-518.html

http://www.straight-grain.com/?p=6274


Monday, May 11, 2015

Pattern review: Banyan shorts by Figgy's


Let me say, I love how these shorts turned out. They are perfectly what I wanted and there's a working zip fly! Woot woot! Check another skill off my imaginary sewing skills I've been avoiding list (I also recently checked off double needle so there's that).

I love the style of Figgy's patterns. This is the fourth I've sewn (Nituna jacket, Sunki dress, unblogged Scirocco). So... I should know by now not to rely on instructions in a Figgy's pattern to learn a new skill. Sigh. The additional instructions on the blog weren't helpful either. The zip fly was rough and required ripping out stitches and googling "how to install a fly zipper". I ended up following the instructions on the Ginger Jeans sewalong from Closet Case Files and they were so much easier to follow. And it looks great and works!


Also, I'm not sure if I was just supposed to pleat the front pleats like the diagram indicated or sew on the markings as per the written instructions (it looks like bloggers have done it both ways and they're both cute). I figured I would sew them as instructed and rip out the stitches if it looked funny. I'm on the fence.

(Update: I ripped out the stitches so now they're pleats and fit better. I'm 90% sure they are actually supposed to be pleats.)

I totally put the bum pocket on the wrong side. Ergh. If it bothers me too much I actually cut out two and I might just add another.


Check out that frog peeking from the pocket. So darn cute. I couldn't resist adding this fabric to my last order from Urban Sew. It was on sale after all, and you get free shipping once you get to $100.


Pattern: Banyan Pants and Shorts by Figgy's

Sizing: Since the other Figgy's patterns I've made run a bit wide and I'd like these shorts to fit now, I sewed up a 2/3 (which was about where Stella's measurements put her anyway) with no modifications. They fit! I also have the failsafe of another little girl not much smaller than Stella if they were too small.

Material used: Twill from Joann's Fabric bought for another project I never got to.

Notions needed: Interfacing (medium weight was overkill but I was out of anything more lightweight), a zipper (leave the bottom stop intact and cut the excess off the top unlike me so you don't have the end of a zipper sticking out. I'll probably cover that with some fabric.), 3/4" elastic (not 1" as listed in the supply list) and a button or snap.

The inside of the fly.
Appropriately rated: No rating, but I would say intermediate with ability to google more instructions or previous experience with fly zippers.

Time spent: A couple hours cutting and taping pattern pieces (which went well, I always appreciate that) and cutting fabric. A couple evenings figuring out the instructions and a looong afternoon (I really wanted to get them done).

Modifications: I topstitched the side seams. It seemed right. As with many Figgy's patterns, the finishing instructions left much to be desired and I often guessed at when and how to finish seams. A few places that I felt it imperative to finish seams without any directions to do so were the pocket (I pinked the edges), the zip flap (finish before topstitching, but before starting the zipper would be ideal), and where the cuff attached to the pants (I trimmed it first).

Comments: I would absolutely recommend this pattern based on the finished product, but with the reservation that the instructions will leave you guessing and doing it differently at times. (The waistband?! I'm pretty sure I didn't do that as intended.) This would be a bad beginner project.

Thanks for stopping by!

Linked up over at:

 
http://www.straight-grain.com/?p=6099
Nap-time creations
 
http://www.straight-grain.com/?p=6099

Saturday, July 14, 2012

(so cute) Baby Girl Shorts Tutorial

Hey look, my first tutorial!  How did I get here?  Through pinterest, I discovered the wonderful world of craft blogs and tutorials.  The first blog I looked at was craftiness is not optional, and I struck gold!  Jess has tons of wonderfully written little girl tutorials that look doable, and are sooo adorable.  Confession time:  I haven't actually done any of them.  However, reading them gave me confidence to make my own outfit.  Awhile ago, I found the sweetest Easter outfit at Gymboree on clearance.  Fuzz has an extremely long torso, and it was a belly shirt instead of a tunic on her -- not quite a look I like.  So, I tweaked and copied it.  Surprisingly, it turned out well!

What do you do when something turns out well?  Make three more of course!  Altogether, I made four little outfits of the same design for Fuzz and her three little friends.  They had pictures on Sunday by Marci, and I'll post one when I get them back.  Somehow, I managed to make four tops without remembering to take pictures from the beginning, but I did take pictures of the shorts.  Here's the end result:
The dress and bias tape fabric is Meadow Gray Peacock Lane by Violet Craft, it looks like they still have it on clearance at Fabric Envy.  The pink is pomegranate by moda (I think, I got it from Joann's), yellow is Bella solids in 30's yellow by moda and blue is kona solids in lagoon.  I was impressed by the quality of all of the fabrics.

Today I'm just going to attempt to explain the shorts.  Make sure the directions make sense to you when you're making them.  Leave a comment if you have any questions. 


(Bear with me, I'm new at this)

Materials needed:
Less than 1/2 yard 44" wide woven fabric
1" single fold bias tape (or 1/2" double fold ironed open)
Elastic cord
Elastic for waistband (I used 1/2")
Note: I used a 3/8" seam allowance unless otherwise stated. 

Optional pre-step: make your own bias tape.  I used this tutorial from made and another one I can't find now.  It was much easier than I thought it would be!  Plus, the quality of the bias tape was (way) better than the store-bought stuff. 

1.  Here's the pattern I made: Shorts front, shorts back 1 and shorts back 2.  I wasn't sure how to share the scanned pattern.  Please let me know if it worked or any suggestions you have to make it easier.  It's basically 12-18 month size, but cut generously so the shorts are extra poofy.  Because baby girls need extra poofy shorts.  Size up or down using bloomers you like the fit of.  Cut two fronts and two backs. 

2.  Pin and sew the fronts to the backs at inseams (A to AA), right sides together.  Press seam open.  (No picture, you can figure that out.)

3.  Pin and sew crotch, matching front to front and back to back (B to B and BB to BB).  Trim seam at curviest part of crotch. 
4.  Open up and pin and sew side seams (C to CC).  So, right sides together front to back.  They should look like shorts now.  I pressed all the seams the same direction to make inserting the elastic in the waistband easier.  You can press the seams however you like.

(Ignore the bias tape around the leg openings for now.)


5.  Open up the single fold bias tape and pin the right side of the bias tape to the right side of the leg openings (D).  When you get all the way around the leg opening, overlap 1/2" and cut.  Now pin the ends of the bias tape together and sew with a 1/4" seam allowance. Press open. 

6.  Now sew in the fold of the bias tape around the leg.


7.  Fold over, press and pin.  

8.  Sew 1/8" away from other edge of bias tape, leaving a 1" opening to insert elastic cord.  Also, sew down the middle of the bias tape. 


9.  Make a casing for the waistband (E), folding over 1/4" then 3/4".  Pin and sew leaving opening to insert elastic.

 10.  Insert elastic cord in leg openings.  Measure around the top of the leg and add 1/2" for overlap.  Close to 10.5" worked for all four little girls.  I found that sewing the elastic cord together by hand was least frustrating.  Sew casing closed.

11.  Insert 1/2" elastic into waistband.  Again, measure your little one, this time around her belly button and add 1/2" for overlap.  The girls varied from 16-20" here, averaging 10 months old.  Overlap and sew elastic ends together with a zigzag stitch or big X.  Sew casing closed.